Why is my bake pixelated - Texel Density
Why is my 4K Bake Pixelated? (Understanding Texel Density)
A recurring question regarding Sanctus Bake is: "I baked my material at a high resolution like 4K (4096px), but when I move the camera close to the object, the texture looks pixelated or blurry. Is there a problem with the bake tool?"
The short answer: No. This is not a bug or a limitation of the tool—this is a fundamental mathematical reality of 2D textures in 3D space. It happens with any baking software or workflow in the industry (Blender, Substance Painter, Unreal Engine, etc.).
The Tiling Material Confusion
Much of this confusion comes from how we are used to working with standard, seamless PBR texture sets downloaded from the internet.
When you apply a seamless texture (like brick or concrete) to a large object, you usually increase the Mapping Scale so the texture repeats (tiles) dozens of times across the surface. Because the 4K image is repeating over and over in small patches, the pixel density remains incredibly high even if the object is massive.
However, when you bake a procedural material, the software has to fit the entire unique surface of your object into a single, flat 4K canvas. The image does not repeat.
The Concept: Texel Density
When you bake a material, you are "stretching" those 4096 x 4096 pixels across the 3D surface of your object using its UV Map. If the object is physically large (like a building facade or a terrain), or if your camera is framing a very tight close-up, those pixels stretch until they become visible squares.
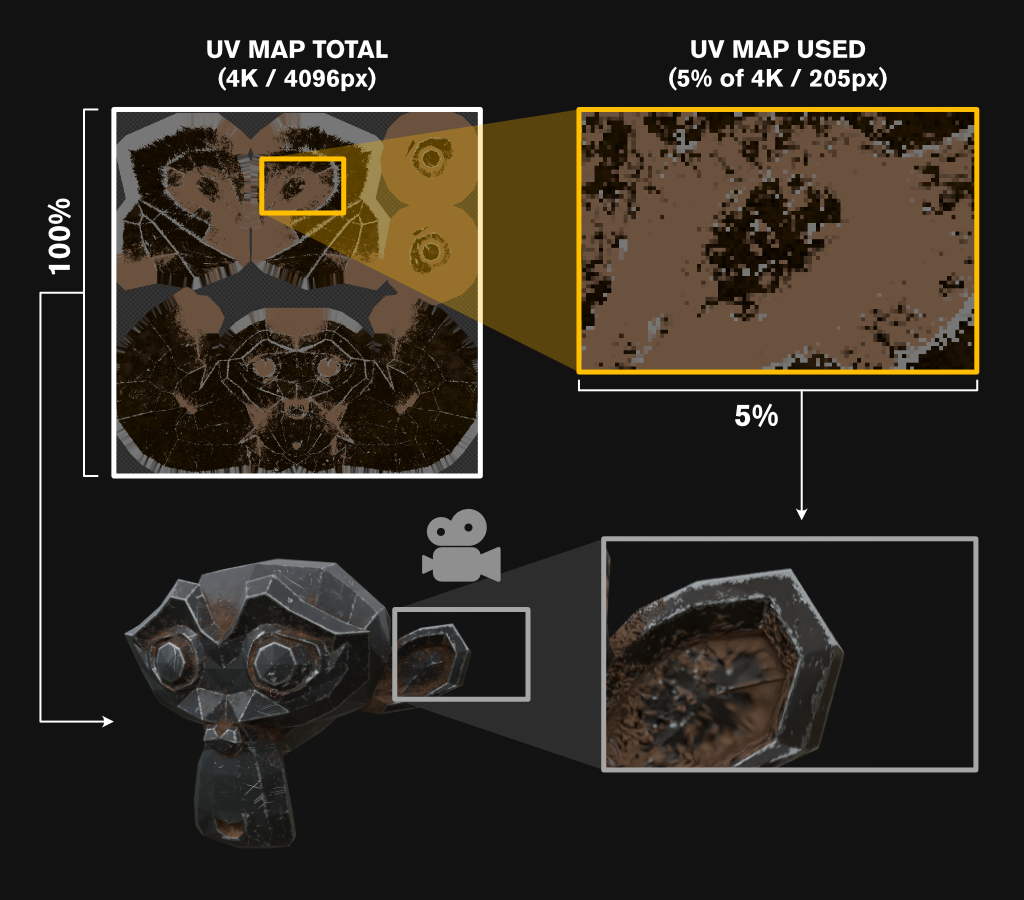
The Zoom Problem This technical diagram illustrates exactly what happens when you hit a close-up shot:
-
The Setup: You have a large object. The 4K image (100% of the texture) is distributed to cover the entire mesh based on your UV layout. If the camera is far away, the quality looks sharp.
-
The Close-up: You move your camera in to capture a specific detail, framing only a tiny fraction—let's say 5%—of the object's overall surface.
-
The Mathematical Reality: Because your shot only covers 5% of the object, you are only seeing 5% of your 4K baked texture. Instead of looking at a 4K image, your camera is stretching a tiny crop of roughly 205 x 205 pixels to fill your entire screen. The result is a pixelated, low-res appearance. It is exactly like doing a 2000% digital zoom on a small photo.
Professional Solutions & Workflows
Instead of cranking the bake resolution up to 8K or 16K (which will drastically drain your VRAM and render times), use one of these standard industry alternatives depending on your scene requirements:
-
Optimize the UV Map Space If certain parts of your object are going to be closer to the camera than others, you shouldn't pack your UV islands evenly. Go to the UV Editor, select the specific faces that the camera will see up close, and scale them up manually so they occupy a much larger area of the UV grid. By giving that specific zone more texture space (e.g., 60% of the canvas instead of 5%), you heavily increase its local pixel count.
-
Isolate and Separate the Close-up Geometry If a specific part of your asset requires an extreme close-up, select those faces in Edit Mode and separate them into a distinct object (Shortcut: P -> Selection). Now, give this new standalone object its own independent material slot and a clean unwrap. This allows the close-up section to utilize 100% of a dedicated 4K texture entirely for itself, rather than sharing it with the rest of the asset.
-
Use the Procedural Version for Close-up Shots If your scene demands a massive camera zoom where even a dedicated 4K bake starts showing pixels, you should not bake that specific material for that shot. The original materials in Sanctus Library are mathematical and procedural; they do not have pixels. For your close-up cameras, bypass the bake tool and use the live node setup directly in Cycles/Eevee. You can zoom in infinitely, and the texture will always compute at perfect, crisp mathematical resolution.